Lady Gaga turned heads at the VMAs in her bold red lace outfit. The look featured dramatic lace coverage, a statement collar, and that off-center crown. I’ve spent years recreating celebrity looks, and this one is surprisingly doable at home.
This guide shows you how to recreate Lady Gaga’s red outfit with simple materials and basic sewing skills. I’ll walk you through making the dress, crafting the crown, and adding those finishing touches.
You’ll get clear instructions for each piece, plus tips to make it wearable for parties or photoshoots. Let’s make this iconic red look your own.
Inspiration for the Lady Gaga Red Outfit

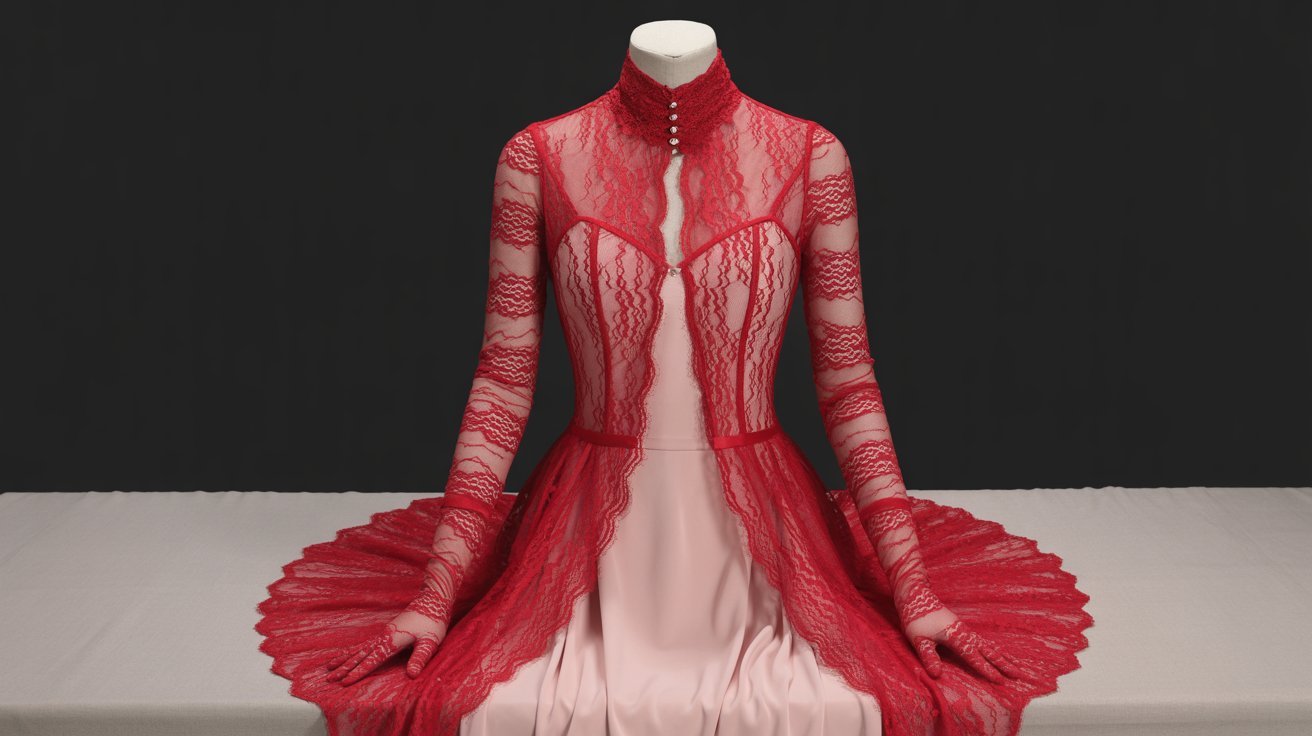
Lady Gaga’s VMA red lace outfit covered her from head to toe in see-through red lace with intricate patterns. Her face disappeared behind a dramatic high collar that created a cowl effect.
The off-kilter crown sat tilted on her head, adding an edgy royal vibe. Long sleeves extended to her wrists, and matching gloves completed the look.
I recommend adding a nude slip underneath for comfort and coverage. You can adjust the collar height to show your face better.
The crown works better if you add elastic or bobby pin loops for security. Consider using stretch lace for easier movement while dancing or walking around.
Materials You’ll Need
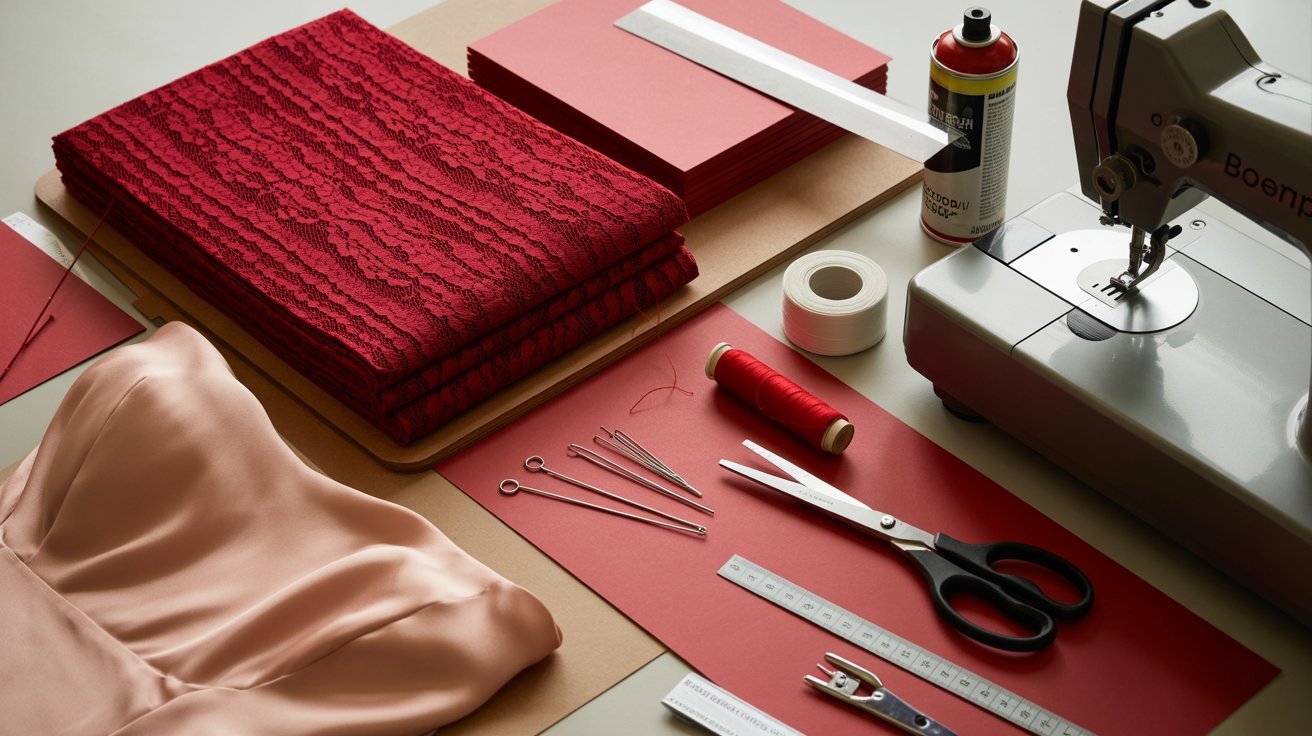
Get about 4 yards of red lace fabric. Look for stretchy lace if you want more flexibility. You’ll need a nude slip dress in your size that matches your skin tone. Grab a red poster board for the crown and a matching red thread.
A sewing machine makes this faster, but hand sewing works too. Get fabric scissors, straight pins, and a measuring tape. You’ll need spray adhesive or fabric glue for the crown. Keep a ruler and pencil handy for marking lines.
Step-by-Step Guide to Create the Lady Gaga Red Outfit
Follow these steps to bring this iconic look to life in your own space.
Step 1: Draping the Dress
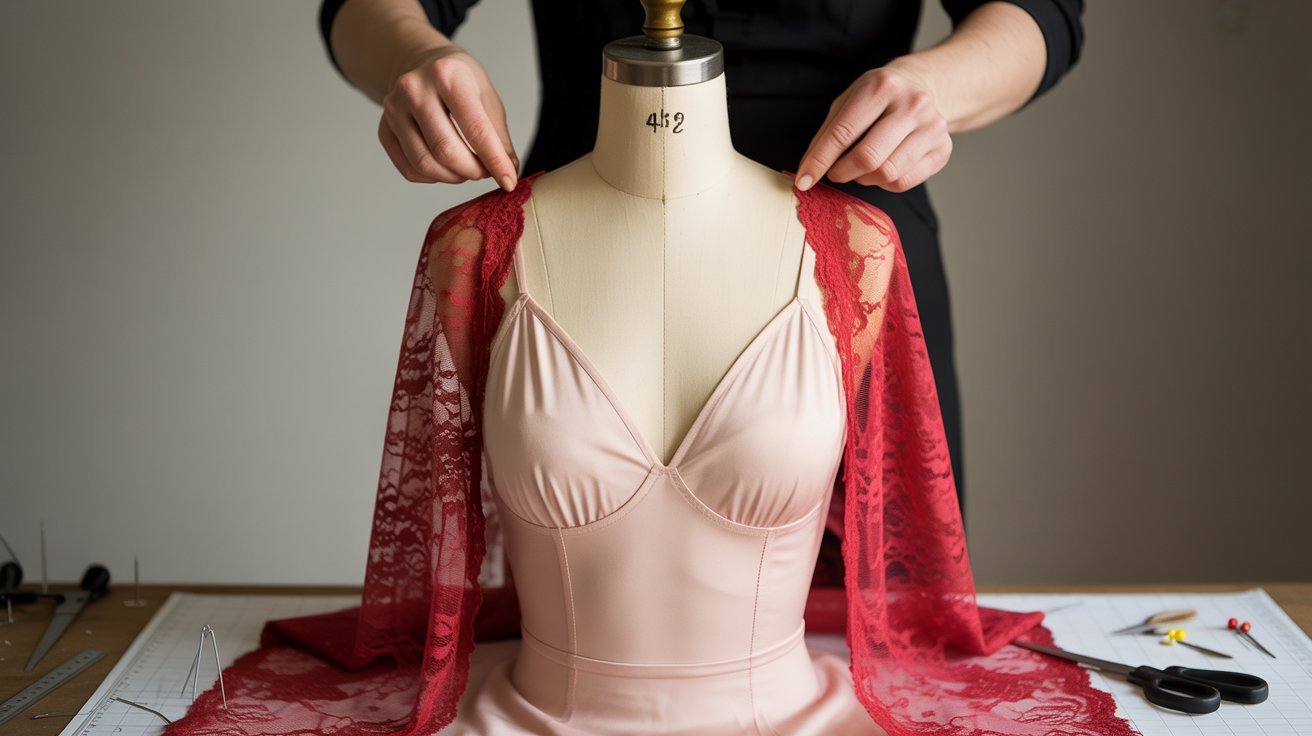
Put your nude slip on the dress form first. Drape your lace from front to back over the shoulders and let it hang naturally. Pin the fabric at the shoulders to hold it in place.
Mark your hemline with pins. Find the center back and pin a straight line down the spine. Use a ruler to straighten your hemline and cut the bottom edge straight across.
Sew the edges with a zigzag stitch to prevent fraying. Pin the center back seam from neck to hem and adjust the fit. Sew the center back seam with a straight stitch and go slow over the lace to avoid snags.
Step 2: Creating the Sleeves
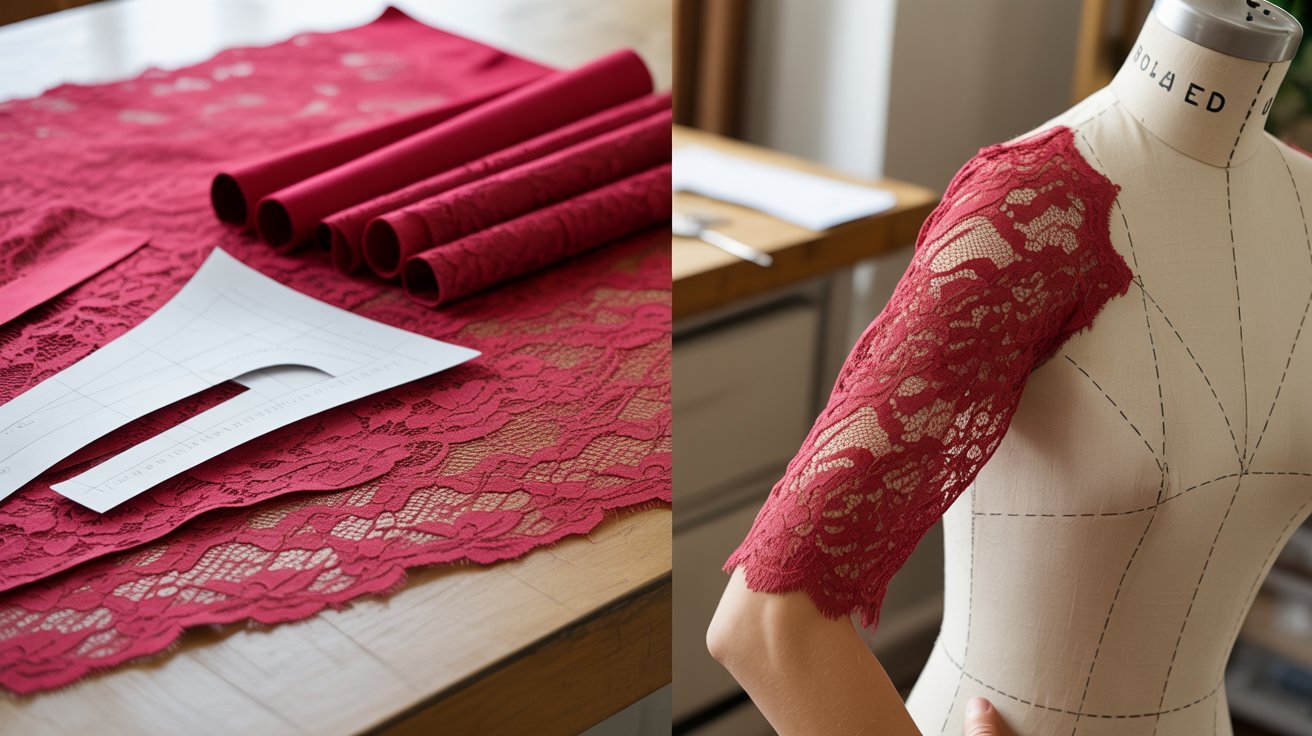
Measure from your shoulder to your wrist with your arm straight. Measure around your bicep and wrist, adding 2 inches to each for seam allowance.
Draw a rectangle on paper that tapers from bicep width to wrist width. Trace this pattern onto your lace twice and cut carefully.
Pin one long edge together, sew from wrist to armpit, and repeat for the second sleeve. Pin sleeves into the armholes and sew around.
For a faster method, cut two rectangles of lace from shoulder to wrist. Fold each in half lengthwise and sew to make tubes. Add diamond-shaped gussets under each arm for better movement.
Step 3: Making the Crown
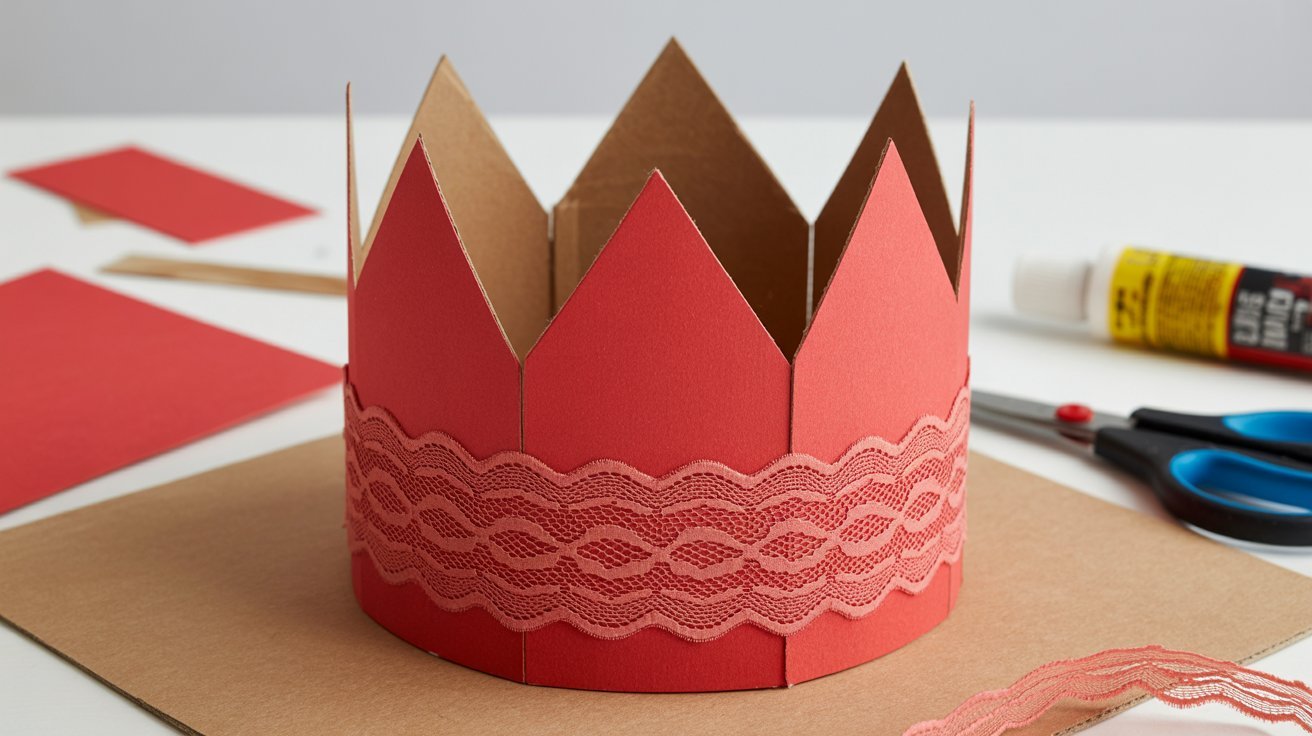
Wrap a measuring tape around your head and add 2 inches for overlap. Cut a rectangle from the poster board about 8 inches tall. Cut the lace 2 inches larger than the board on all sides.
Spray the poster board with adhesive and press the lace on firmly. Fold the extra lace over the edges and glue it down.
Cut jagged points along the top edge in random heights. Secure the ends with strong glue or duct tape inside.
Step 4: Accessories and Final Touches
Cut rectangles from leftover lace to fit your hands. Fold and sew up the sides, leaving the top open. Cut small slits for your thumbs. Or buy red lace gloves from a costume shop.
Put on your nude slip first and pull the lace dress over carefully. Arrange the collar and place the crown on your head at an angle.
Bobby pins it for security. Pull on your gloves last and take test photos before your event.
Styling Your Lady Gaga Red Outfit
Once your outfit is complete, here’s how to style it for maximum impact.
Keep your makeup bold and dramatic to match the outfit’s intensity. Red lipstick works perfectly with the all-red look. Add dramatic eyeliner or smoky eyes for that Gaga vibe.
Consider wearing a red or blonde wig to complete the process. Style your wig in voluminous waves or a sleek updo.
Choose the right shoes to balance the look. Red heels or boots keep the color scheme consistent. Platform shoes add height and drama like Gaga’s signature style.
Add red jewelry sparingly since too many accessories can overwhelm the intricate lace. A single statement ring or bold earrings is enough.
Practice walking and sitting in your outfit before the event. Lace can be delicate, and you’ll want to move confidently. Test how the crown stays in place when you move your head.
Tips for the Perfect Lady Gaga Red Outfit
These practical tips will help you avoid common mistakes and get professional-looking results.
- Start with a good base layer that fits well. Your nude slip should be smooth and seamless.
- Choose lace with some stretch for easier wear. Non-stretch lace looks great but can be restrictive.
- Pin everything before sewing. Lace shifts easily, and pins keep your seams straight.
- Use a new, sharp needle in your machine. Dull needles snag lace and create pulled threads.
- Go slow while sewing. Rushing leads to mistakes that are hard to fix in delicate fabric.
- Try on the outfit multiple times during construction. Small adjustments early save big fixes later.
- Add a red bodysuit under the slip for extra coverage. This gives you more confidence wearing sheer fabric.
- Keep your crown lightweight. Heavy poster board will give you a headache after an hour.
Conclusion
You now have everything you need to recreate Lady Gaga’s red outfit at home. The process takes patience, but the result is worth it. I love seeing people bring celebrity looks to life with their own twist.
Wear your creation with confidence. Post photos online and tag your work. Other fans will appreciate seeing your version.
Try adding your own details to make it yours. Maybe different lace patterns or accessories. Share your results in the comments below. I’d love to see how your outfit turns out.
Frequently Asked Questions
What type of lace works best for this costume?
Stretch lace is your best option for comfort and fit. It moves with you and is more forgiving than rigid lace. Non-stretch lace looks closer to the original but can be harder to work with.
Can I make this without a sewing machine?
Yes, hand sewing works fine for this project. It takes longer but gives you more control over delicate lace. Use small stitches and go slowly around curves for the best results.
How much does it cost to make this outfit?
Expect to spend between $30 and $60 on materials. Lace costs about $8-15 per yard, and you need 4 yards. A nude slip runs $10-20, and poster board costs $3-5.
How long does it take to complete?
Plan for 6-8 hours of work spread over a weekend. Draping and fitting take about 2 hours. Sewing the dress takes 3-4 hours, and the crown adds another 1-2 hours.
Can I wash the finished outfit?
Hand-wash the lace dress in cold water with gentle detergent. Lay it flat to dry on towels. Never put lace in the washing machine or dryer, and keep the crown away from water.